|
|
Using Actions |
NOTE: this page contains information about Resize Magic version 1.1.
This is an old version still available for users of older versions of Photoshop
or other programs.
Owners of Photoshop CS3 and later should use the newer version and should ignore this page.
Resize Magic V1.1 comes with a set of actions that automate its working. The actions are contained in the "ResizeMagic.atn" file that you have downloaded. To install the actions follow these steps:
- start Photoshop
- choose the Actions palette
- drag and drop the "ResizeMagic.atn" file into the Actions palette.
The Actions palette will show a new "Resize Magic" set:
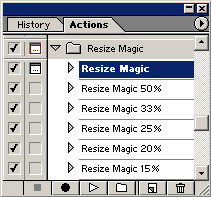
The actions ending with a % number are ready to use and will reduce the image size to a fixed percent of the original size. These actions do not ask anything to the user.
The first action (Resize Magic) has a small form painted to the left: this means that it will show up the standard "Image Size" dialog box and that you will be able to set the new image size. You can use this action every time that you need to resize an image to a particular dimension.
How to create your own Resize Magic actions
You will need to create your own actions in order to batch resize many images with a single command.
Open the Actions palette, locate the "Resize Magic" action and click on it so that it is selected. Next, click the Actions menu (the small triangle in a circle at the upper right corner of the Actions palette) and select the Duplicate command:
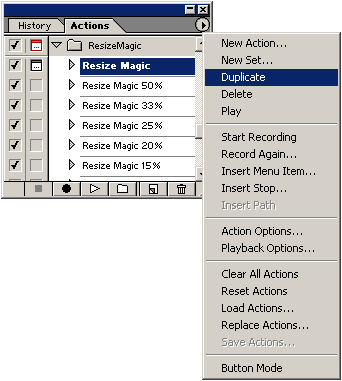
This will create a new action called "Resize Magic copy". Double-click this action and type a new name, for example "Resize Magic Height=64":
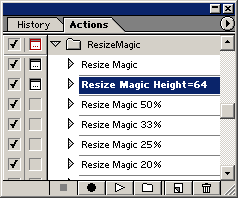
Open your new action by clicking on the small triangles to the left so that it looks this way:

Now double click where you see "50%" in the above image: the Image Size dialog will show up and you will be able to resize the image as you like, for example to set image height to 64 pixels. The opened image will be resized: close it without saving it or it will be resized twice. If you look at the Actions palette you can see that now the Image Size parameters have changed to the values that you have entered. Now click on the small form icon at the left of "Resize Magic" to make it disappear, so that Photoshop will not show up the dialog box for each image.
How to batch resize images
You can use Resize Magic to resize many images in a single step. You must first create an action that resizes an image to the desired size (see above), than you can use the Batch command to apply that action to the images.
Copy the images that you want to resize to a folder. Be sure to have a backup copy of the images.
Create an action that resizes the images as you want. You can also modify or use an existing one.
Now select the "File/Automate/Batch..." menu command to open the Batch dialog box. In the Play section select the action that you want to use. In the Source section select "Folder" from the combo box and choose the folder that contains the images to be resized. Select "Suppress Color Profile Warnings". In the Destination section select "Save and Close" from the combo box.
Now you can press the OK button to resize all the images in the folder. The resizing can take some time, but the "Resize Magic NI" filters run at low priority so they will not slow down your computer. When the resizing is done remember to click again the small form icon at the left of "Resize Magic" to make it appear again, so that the action will show the Image Size dialog again.
Of course this is only a quick introduction to Photoshop actions: experienced users may use them in many different ways.